
With ASUS, not everything is quite so simple. I will show you my way. It may be longer or harder but it is the right way to do it in my humble opinion.
For example, you can have 3 similar ASUS motherboards, all being the same model, all of which will have different BIOS versions.
I will give you an example and my version of preparing BIOS from ASUS website and in the process I am always cleaning Intel ME while doing it so you have fully cleaned BIOS, no DMI data, no password, nothing.
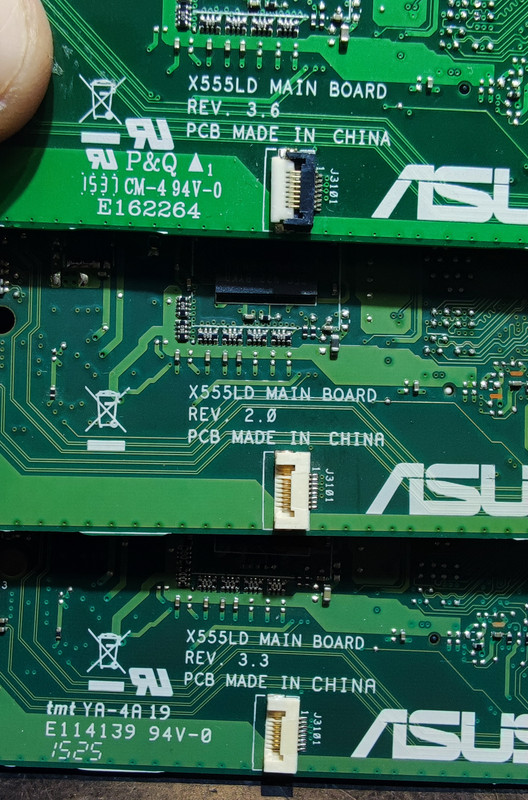
This is the picture of 3 similar ASUS motherboards, all of them being X555LD but different versions:
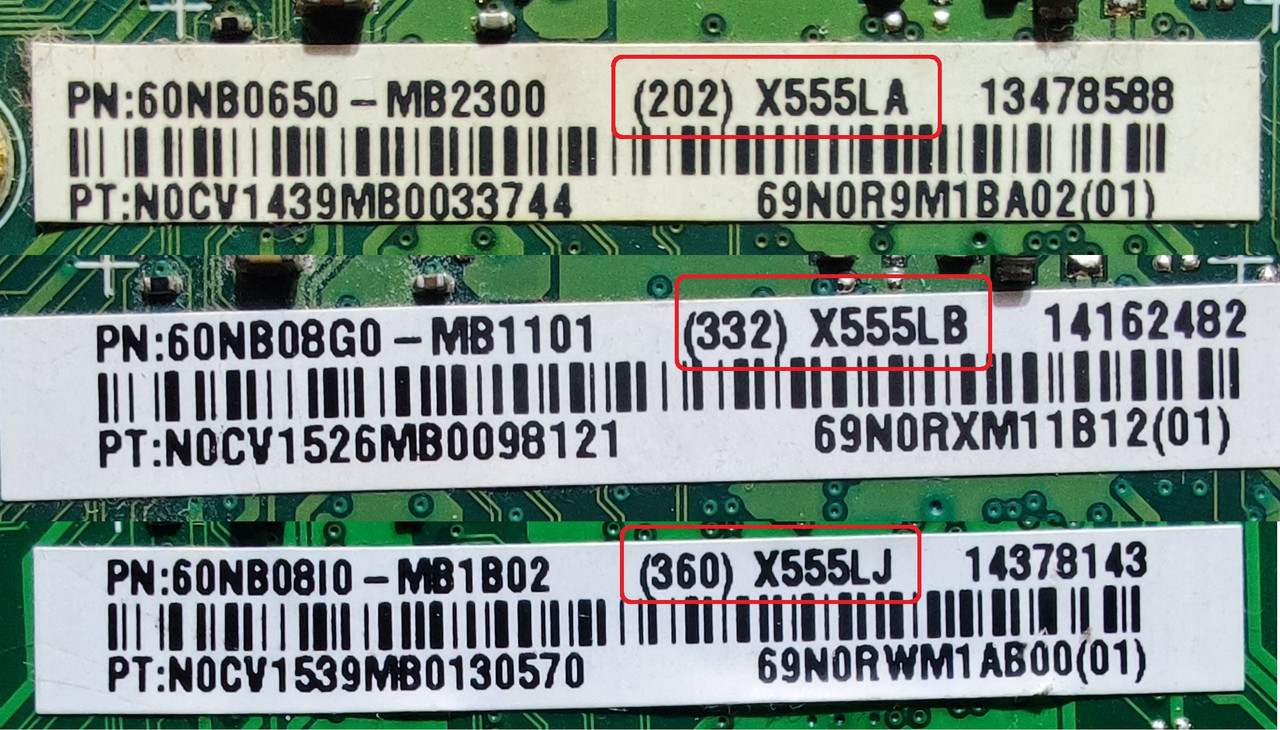
In next picture below, all of them have different BIOS versions. On ASUS motherboards, always look for this sticker, it will tell you the correct BIOS version and version which came with the board. (I am sorry if I didn't order pictures correctly, to mach boards with stickers, I am just writing to help you know what to look for when you get one for repair)
First board has X555LA bios version 202, ASUS is naming it X555LAAS.202
Second board has X555LB bios version 332, ASUS is naming it X555LBAS.332
Third board has X555LJ bios version 360, ASUS is naming it X555LJAS.360
Note that all BIOS files downloaded from ASUS website have "AS" suffix next to model name followed by the BIOS version. I will tell you later, one more info about that.
I think this ASUS X555LD motherboard has the most BIOS versions. Couple more BIOS versions also applicable for this motherboard are: X555LAB, X555LN, X555LNB, X555LD, X555LDB.
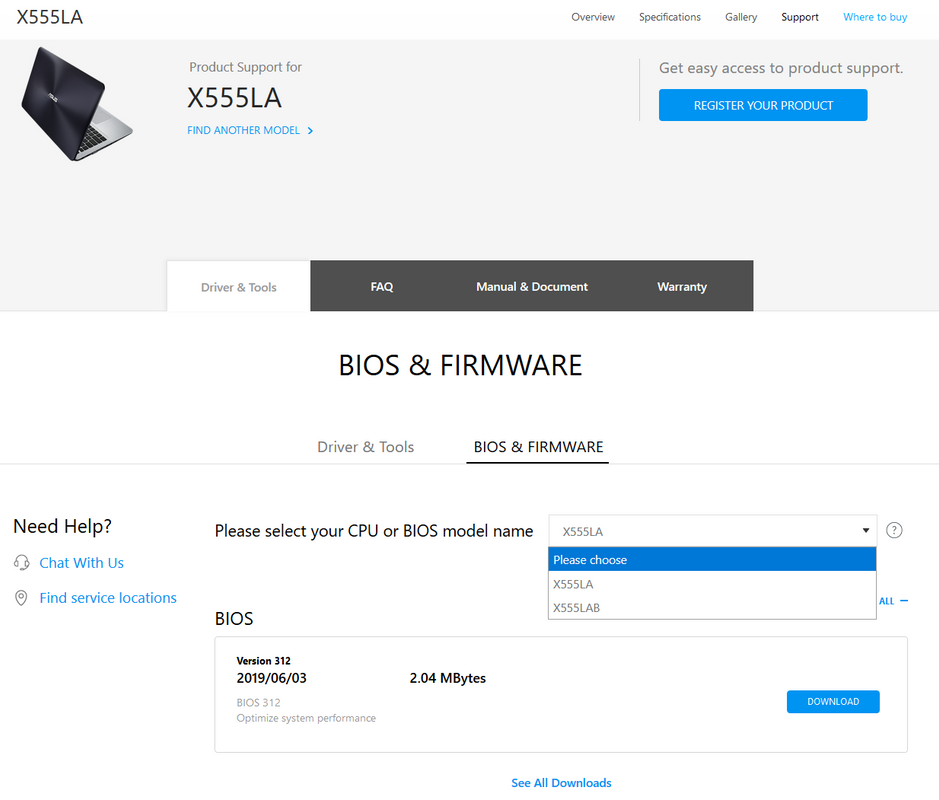
Next, now you know the correct version of the BIOS that goes into your motherboard, go to ASUS support website or search through Google if you don't see the specific model on ASUS website, and download BIOS for the notebook model written on the sticker. If it is written X555LA on the sticker than type X555LA and download BIOS that says X555LA.
Next step is to read your original BIOS from the board and open it in HEX editor. I use WinHEX because it is easiest to work with. Go to Search -> Find Text or just press Ctrl+F on a keyboard and type in X555. Don't type anything else after X555, it's easier to find the correct version.
I opened a random BIOS I have on my server so it will not mach the one written on a sticker here, but you get the point. When you read yours it should mach 100% if no one before you tampered with it or updated it.
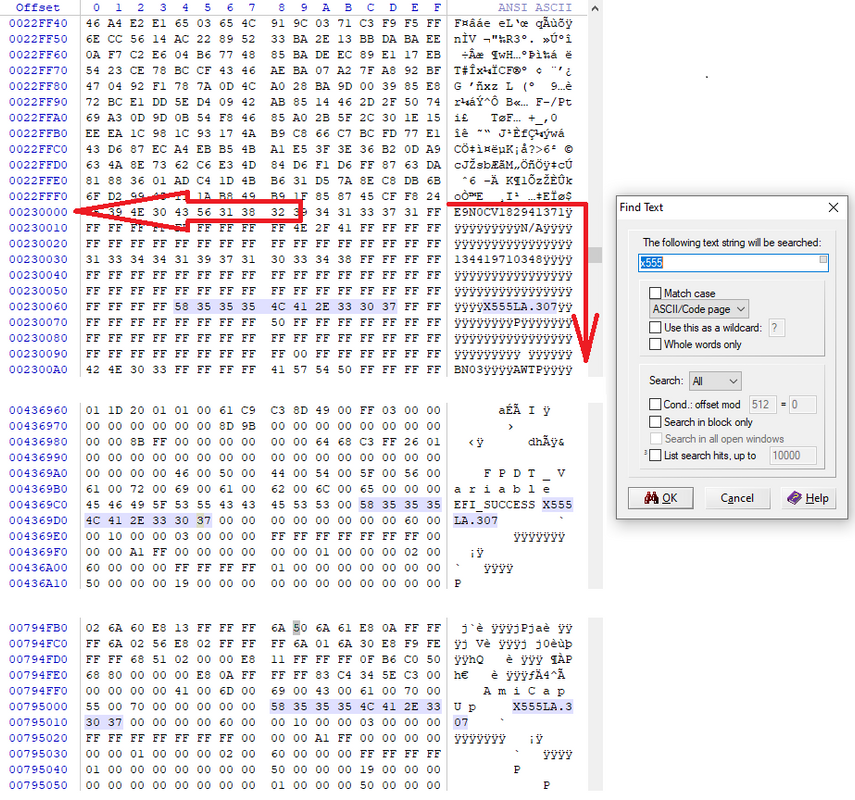
On the picture you can see there are couple of places where you can find out exactly what bios version it is. The address 0x230000 is where DMI data starts, and it ends with 0x27FFFF. If you want your serial number, model, windows key, you need to copy this information from old BIOS to the new one you will make later on...
Next step is to check the Intel ME version used in original BIOS file. Use the ME Analyzer that plutomaniac made from Win-Raid forums and find out the version.
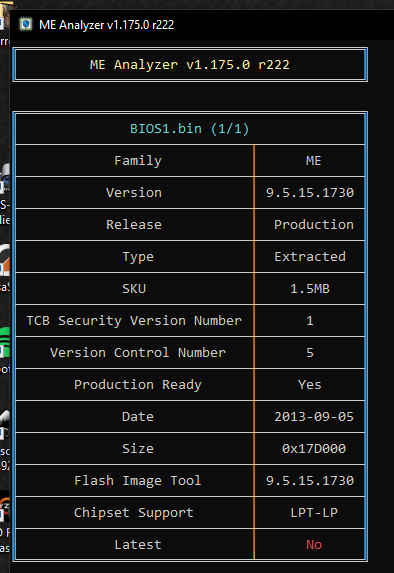
We see here that we need Intel ME 9.5.15.1730 firmware with 1,5MB in size from Win-Raid repository and you will need Intel ME 9.5 System Tools also from Win-Raid forums. Unpack Flash Image tool and the correct clean ME firmware from the archives.

Now, you will have to use this great guide, again from Win-Raid forums, that is being constantly updated with new stuff. Follow D3. ME 7 - 10 & TXE 1 - 2 paragraph with a little bit of changes which I will tell you now. Skip the preparation of ME region because we already did that. Go all the way to the step 7, here is where we make one change. Unpack and copy previously downloaded BIOS from ASUS website to the FITC folder and also copy clean ME region file. Open the extracted ASUS file in HEX Editor and delete first 2KB of it. Almost on all downloaded ASUS BIOS files you need to delete first 2KB. You can also compare the 2 files in HEX editor and make the downloaded file from ASUS start exactly like BIOS Region.bin file.
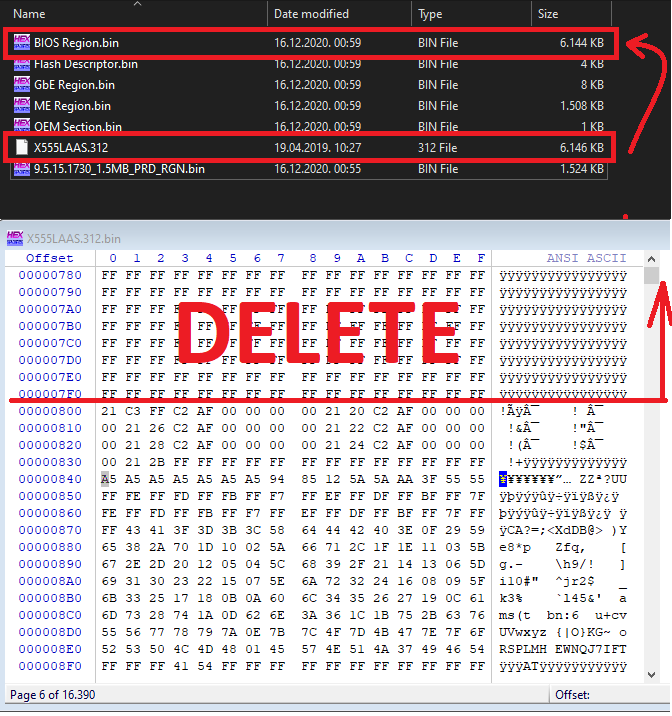
Now you only have to remove original BIOS Region.bin file and ME Region.bin file from the folder and rename your files exactly like the ones you removed.
X555LAAS.312 to BIOS Region.bin and
9.5.15.1730_1.5MB_PRD_RGN.bin to ME Region.bin
Continue with Step 8 and further and make your completely clean BIOS that will be in "Build" folder named outimage.bin. Step 11 and 12 are not needed. I never did any of that.
I suggest you rename this outimage.bin file to X555LAAS.312.bin (the name you get when extracting bios from ASUS website with .bin extension added to the end) so you would know that this is the clean complete BIOS image for ASUS X555LD motherboard with bios X555LA version 312.
You may now open old BIOS and newly made BIOS in HEX editor, it is easier to compare them and copy the DMI data from old bios file to new and always Save As new BIOS file so you will have your clean file untouched. Most ASUS notebooks work great without copying the DMI data, just program the correct made image without DMI data.
For the "AS" suffix. There are engineering BIOS-es for ASUS notebooks. They are the files that only ASUS Engineers can download from their servers with specific hardware installed at ASUS service centre. Those files are already complete BIOS files with Clean ME and no DMI data already setup for every notebook that exists from ASUS. You will recognize these BIOS-es because insted of the "AS" suffix after the bios model, they have an "F1" suffix.
X555LAAS.317 -> X555LAF1.317
That is all from me. If I remember anything else, I will add to my post. Moderators can also move this tutorial to the second place if possible, for easier access.
Thank you all for reading and happy modding.
For example, you can have 3 similar ASUS motherboards, all being the same model, all of which will have different BIOS versions.
I will give you an example and my version of preparing BIOS from ASUS website and in the process I am always cleaning Intel ME while doing it so you have fully cleaned BIOS, no DMI data, no password, nothing.
This is the picture of 3 similar ASUS motherboards, all of them being X555LD but different versions:
In next picture below, all of them have different BIOS versions. On ASUS motherboards, always look for this sticker, it will tell you the correct BIOS version and version which came with the board. (I am sorry if I didn't order pictures correctly, to mach boards with stickers, I am just writing to help you know what to look for when you get one for repair)
First board has X555LA bios version 202, ASUS is naming it X555LAAS.202
Second board has X555LB bios version 332, ASUS is naming it X555LBAS.332
Third board has X555LJ bios version 360, ASUS is naming it X555LJAS.360
Note that all BIOS files downloaded from ASUS website have "AS" suffix next to model name followed by the BIOS version. I will tell you later, one more info about that.
I think this ASUS X555LD motherboard has the most BIOS versions. Couple more BIOS versions also applicable for this motherboard are: X555LAB, X555LN, X555LNB, X555LD, X555LDB.
Next, now you know the correct version of the BIOS that goes into your motherboard, go to ASUS support website or search through Google if you don't see the specific model on ASUS website, and download BIOS for the notebook model written on the sticker. If it is written X555LA on the sticker than type X555LA and download BIOS that says X555LA.
Next step is to read your original BIOS from the board and open it in HEX editor. I use WinHEX because it is easiest to work with. Go to Search -> Find Text or just press Ctrl+F on a keyboard and type in X555. Don't type anything else after X555, it's easier to find the correct version.
I opened a random BIOS I have on my server so it will not mach the one written on a sticker here, but you get the point. When you read yours it should mach 100% if no one before you tampered with it or updated it.
On the picture you can see there are couple of places where you can find out exactly what bios version it is. The address 0x230000 is where DMI data starts, and it ends with 0x27FFFF. If you want your serial number, model, windows key, you need to copy this information from old BIOS to the new one you will make later on...
Next step is to check the Intel ME version used in original BIOS file. Use the ME Analyzer that plutomaniac made from Win-Raid forums and find out the version.
We see here that we need Intel ME 9.5.15.1730 firmware with 1,5MB in size from Win-Raid repository and you will need Intel ME 9.5 System Tools also from Win-Raid forums. Unpack Flash Image tool and the correct clean ME firmware from the archives.
Now, you will have to use this great guide, again from Win-Raid forums, that is being constantly updated with new stuff. Follow D3. ME 7 - 10 & TXE 1 - 2 paragraph with a little bit of changes which I will tell you now. Skip the preparation of ME region because we already did that. Go all the way to the step 7, here is where we make one change. Unpack and copy previously downloaded BIOS from ASUS website to the FITC folder and also copy clean ME region file. Open the extracted ASUS file in HEX Editor and delete first 2KB of it. Almost on all downloaded ASUS BIOS files you need to delete first 2KB. You can also compare the 2 files in HEX editor and make the downloaded file from ASUS start exactly like BIOS Region.bin file.
Now you only have to remove original BIOS Region.bin file and ME Region.bin file from the folder and rename your files exactly like the ones you removed.
X555LAAS.312 to BIOS Region.bin and
9.5.15.1730_1.5MB_PRD_RGN.bin to ME Region.bin
Continue with Step 8 and further and make your completely clean BIOS that will be in "Build" folder named outimage.bin. Step 11 and 12 are not needed. I never did any of that.
I suggest you rename this outimage.bin file to X555LAAS.312.bin (the name you get when extracting bios from ASUS website with .bin extension added to the end) so you would know that this is the clean complete BIOS image for ASUS X555LD motherboard with bios X555LA version 312.
You may now open old BIOS and newly made BIOS in HEX editor, it is easier to compare them and copy the DMI data from old bios file to new and always Save As new BIOS file so you will have your clean file untouched. Most ASUS notebooks work great without copying the DMI data, just program the correct made image without DMI data.
For the "AS" suffix. There are engineering BIOS-es for ASUS notebooks. They are the files that only ASUS Engineers can download from their servers with specific hardware installed at ASUS service centre. Those files are already complete BIOS files with Clean ME and no DMI data already setup for every notebook that exists from ASUS. You will recognize these BIOS-es because insted of the "AS" suffix after the bios model, they have an "F1" suffix.
X555LAAS.317 -> X555LAF1.317
That is all from me. If I remember anything else, I will add to my post. Moderators can also move this tutorial to the second place if possible, for easier access.
Thank you all for reading and happy modding.
Attached Files
if you find these attachements useful please consider making a small donation to the site

 Thanks Excelent


Comment