Completely rebuilt YueLin YLP-013

Collapse
X
 
  • Time
  • Show
Clear All
new posts
  • 370forlife
    Large Marge
    • Aug 2008
    • 3112
    • United States

    #1

    Completely rebuilt YueLin YLP-013

    I got two of these for free from my friend that runs these lan parties around here. One blew a primary switcher (the one running the 260's,) and the other was just fine. So I used the blown one as a reference and in case I blew out or damaged some part while replacing the more complex parts. He used to have them both running his dual gtx260 rig before he got his third, one running mobo, cpu (q9550 oc'd to 3.4ghz,) and hard drive, the other running both gtx260's. It somehow ran just fine (well, until the blow out). This is based on the same pcb as the Powork 650 on the JG bargain basement roundup that made it to about 350W, with smaller parts, so I figured it has some potential.

    What I did:

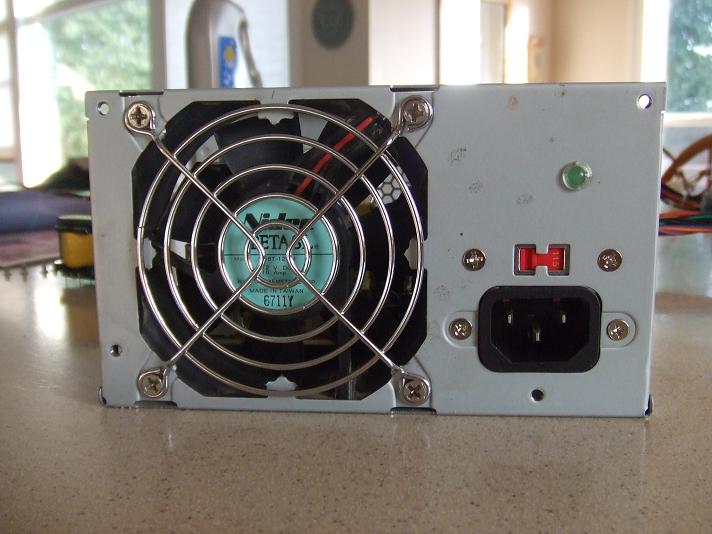
    First off, I needed a case to put it in. Bestec to the rescue! I used a bestec atx-250-12Z case that I had laying around, already had a X cap on the AC receptacle, cut out the punched out fan grill and used one of those wire fan grills with a nidec 35cfm fan.


    Replaced canicon 200v 470uf primaries with UCC SMG 200v 680uf primaries, replaced 4A 400v bridge rectifier with 8A 800V bridge rectifier, put in two .22uf X caps, and a coil.


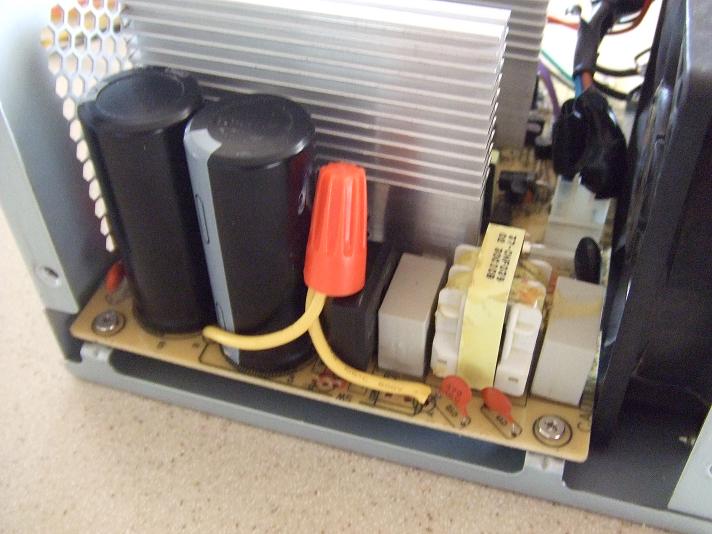
    The secondary caps were a joke. They were tiny, but not overrated for their size. All of them were Micon brand. They were just ridiculously low value. The 12v was filtered by 1 16v, 1000uf, and a 16v 470uf (no, it was not the -12v cap,) same for the 5v, but with 10v caps, and the 3.3v had just a 10v, 470uf. Pitiful, eh? Anyways, replaced the two 16v caps with 16v, 1500uf UCC's, replaced the two 10v caps with Rubycon 10v, 1500uf and 10v, 1000uf. There is a second 12v rail marked out on the pcb and it has caps for it, which were the same story as the other 12v, and replaced those with two Panasonic 16v, 1500uf's. Finally, the 3.3v got a rubycon 10v, 1500uf.

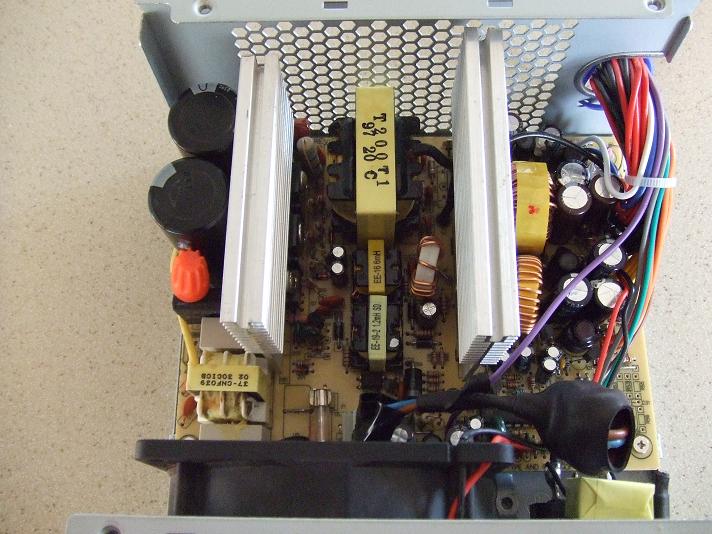
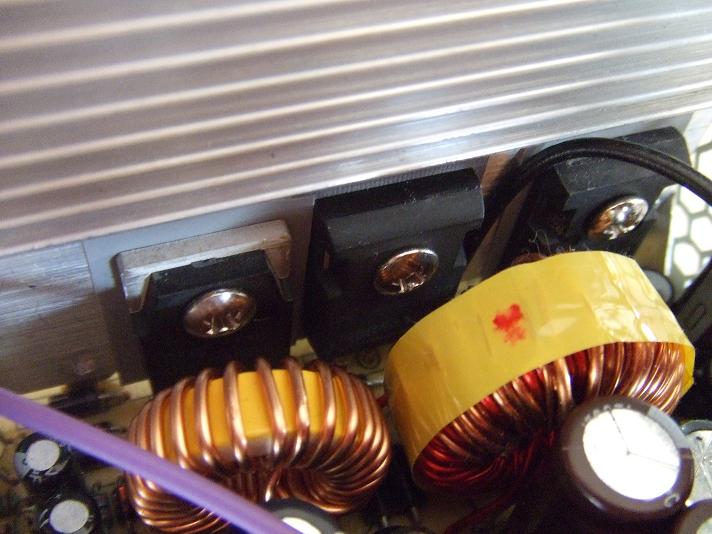
    Now, the more advanced stuff. I took out the primary heatsink, it was quite easy and it didn't take more than a $15 radio shack (I'm sorry, the shack,) 40W soldering iron with solder sucker attachment to get it out. I replaced the two small imitation fairchild (the logo looked like the fairchild F, but had the dash taken out of it so it was a J) tiny primary switchers to the primary switchers from a wrecked 400W CWT. I then put the heatsink back in and tested it, worked great.


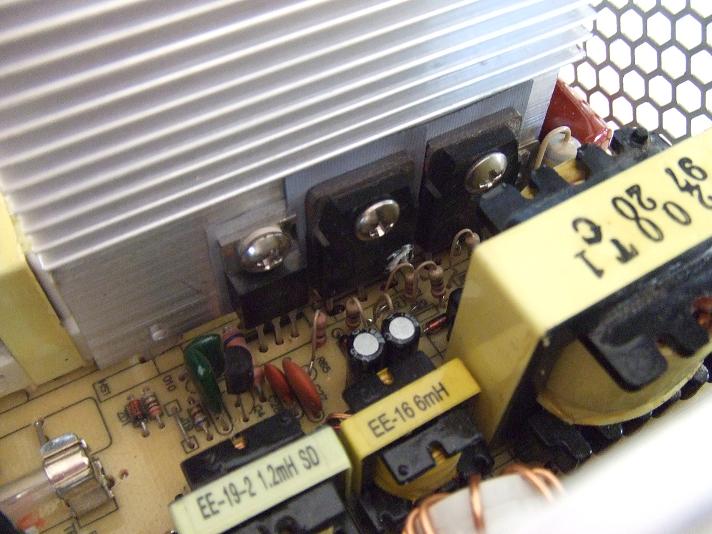
    Next, I replaced the secondary side components. It had a somewhat beefy 5v silicon, but the 12v and 3.3v were a joke. So I replaced the 12v diode with the 12v one from the CWT, the 5v one was replaced by the 5v one from a proprietary dell newton 200W, it had a 5v rated at 22A. and the 3.3v got the 5v's old one. Powered it up again, and it started right up. Read the voltages, 5v, 5.16. 3.3v, 3.41. 12v, 12.54...wait, thats a little high, I'm just going to assume thats due to the low 12v load with just one hard drive. It was 12.39 before I changed the secondary silicon. Maybe just because of the larger capacity?


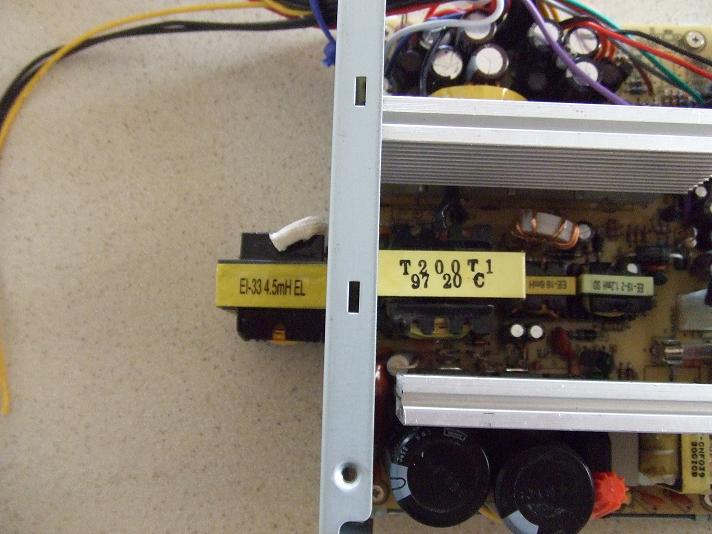
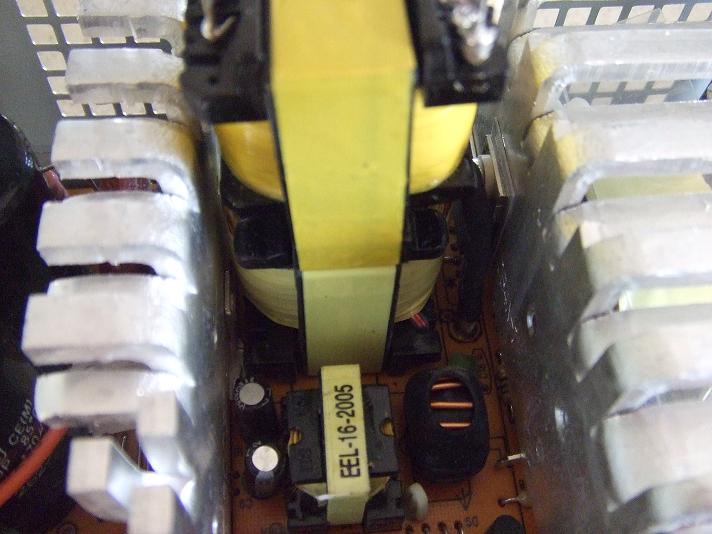
    Finally, I replaced the "33" labeled transformer (the hairong 480W from the JG bargain roundup had a 33 transformer that did 284 watts,) with one from a old AT 300W AGI Hipro built (blown caps, not much use for a AT psu with extra short leads). This thing is much larger than the "33" labeled transformer. I am sure that it can do my new labeled specs.


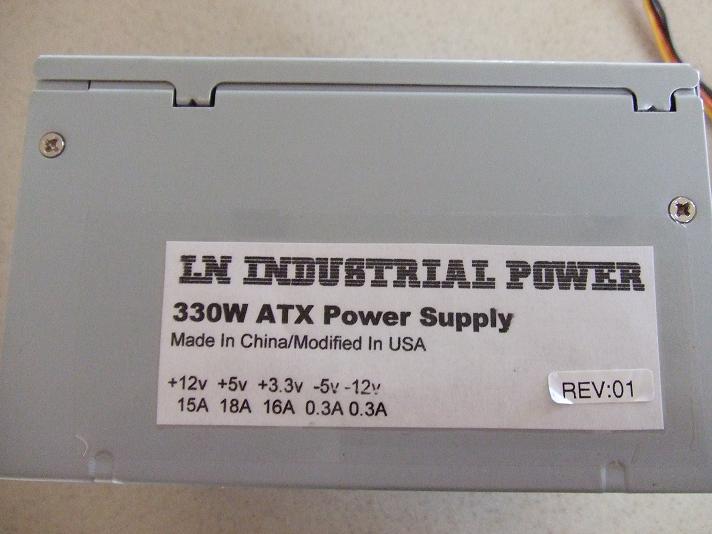
    (yes, LN are my initials)

    Also, a word about these "33" and "35" labeled transformers. I don't think it means squat. As you can see from one of my pictures, I put the old "33" transformer from my YueLin on top of the "35" labeled transformer from my 350W rosewill. Same size.

    Attached Files
    Last edited by 370forlife; 08-25-2009, 06:06 PM.
  • lucky13
    Badcaps Veteran
    • Aug 2007
    • 412

    #2
    Re: Completely rebuilt YueLin YLP-013

    Wow, everyone is rebuilding or transforming wimpy p/s into something much more beefyer!

    Makes me want to go p/u a DEER and run with it....

    Thanks for sharing 370

    Comment

    • Newbie2
      Badcaps Veteran
      • Sep 2005
      • 885
      • Canada

      #3
      Re: Completely rebuilt YueLin YLP-013

      Probably this is the most advanced PSU rebuild witnessed on badcaps.

      Great work!
      My gaming PC:
      AMD Phenom II X6 1100T Black Edition 3.3GHz Six-Core CPU (Socket AM3)
      ASUS M4A77TD AMD 770 AM3 Motherboard
      PowerColor AMD Radeon RX 480 8GB GDDR5 PCI-Express x16 3.0 Graphics Card
      G.SKILL Value Series 16GB DDR3-1333 RAM (4x4GB dual channel)
      TOSHIBA DT01ACA200 2TB 3.5" SATA HDD (x2)
      WD Caviar Green WD20EARX 2TB 3.5" SATA HDD
      ASUS Xonar DG 5.1 Channel PCI sound card
      Antec HCG-750M 750W ATX12V v2.32 80 PLUS BRONZE Power Supply
      Antec Three Hundred Mid-Tower Case
      Microsoft Windows 10 Pro 64-bit
      Microsoft Windows 7 Ultimate SP1 64-bit

      Comment

      • momaka
        master hoarder
        • May 2008
        • 12175
        • Bulgaria

        #4
        Re: Completely rebuilt YueLin YLP-013

        Originally posted by Newbie2
        Probably this is the most advanced PSU rebuild witnessed on badcaps.
        Great work!
        I agree. A damn mad job and no less.

        Originally posted by 370forlife
        Also, a word about these "33" and "35" labeled transformers. I don't think it means squat. As you can see from one of my pictures, I put the old "33" transformer from my YueLin on top of the "35" labeled transformer from my 350W rosewill. Same size.
        That's because your Deer-made Rosewill has fake "35" marking on its transformer. I have a L&C like that too. A true 35 transformer will be about 1cm higher than a 33 rated one.

        Also, I'm not sure if changing the primary switchers with bigger ones was a good idea or not. From what I've heard, the more powerful switchers could be under-driven, causing the PSU to be less efficient. But perhaps someone with more knowledge on electronics can say if that's true or not.

        Otherwise you did some great work. Nice label too .
        Make sure to hook up that LED in the back. I heard they give 100+ watts of extra power to any PSU .

        Comment

        • 370forlife
          Large Marge
          • Aug 2008
          • 3112
          • United States

          #5
          Re: Completely rebuilt YueLin YLP-013

          I should also add 14 led fan's, that automatically makes it a 650W.

          Regarding the primary switchers, I just don't want them to blow out at too high of a load. I would guess the originals could maybe do 300. The ones from the CWT can do at least 400, and most even decent psu's overbuild the primary and secondary silicon for better stability. The delta built antec CPX 850W has 360A of capacity for it's 12v rails.

          Also, don't ever replace the 5vsb switcher or diode, whatever it is, because it doesn't just pop the fuse. It explodes it. This yuelin is pretty strong, it went through quite a bit of abuse from my trial and error.
          Last edited by 370forlife; 08-25-2009, 10:14 PM.

          Comment

          • etnietering
            Badcaps Veteran
            • Apr 2009
            • 379
            • USA

            #6
            Re: Completely rebuilt YueLin YLP-013

            great job man! and you can get another hundred watts out of it if you spray paint it silver...

            Comment

            • yanz
              Badcaps Veteran
              • Nov 2004
              • 910

              #7
              Re: Completely rebuilt YueLin YLP-013

              transplanting a better transformer, something that i wanna try doing but too afraid to see unexpected result. but your result is guidance for me. nice work!
              days are so short when you actually do something..

              Comment

              • 370forlife
                Large Marge
                • Aug 2008
                • 3112
                • United States

                #8
                Re: Completely rebuilt YueLin YLP-013

                Problem with these cheap psu's is the transformer they usually use is really hard to find in nicer psu's. They are the ones that have the big grounding cable coming out the top. The only higher wattage non-gutless wonder psu I have seen with one in it was the 400W CWT Antec. Except it was huge and had more pins than what the original transformer in this one did, and it is still putting up a fight and doesn't want out. Other than that, you can find them in old AT psu's.

                Comment

                • humblesmith1
                  Marine555
                  • Dec 2011
                  • 22

                  #9
                  Re: Completely rebuilt YueLin YLP-013

                  Do you know the part number for Q7 ?

                  Thanks

                  Comment

                  • Pentium4
                    CapXon Be Gone
                    • Sep 2011
                    • 3741
                    • USA

                    #10
                    Re: Completely rebuilt YueLin YLP-013

                    I know this is an old thread, but I'm really impressed by this rebuild. Nice job 370 are you still using it??

                    Also, how can you know if the transformer is going to work even if the pins line up, because doesn't it depend on how it was wound internally?

                    Comment

                    • 370forlife
                      Large Marge
                      • Aug 2008
                      • 3112
                      • United States

                      #11
                      Re: Completely rebuilt YueLin YLP-013

                      I think I followed the traces on the underside of both units and made sure the pins went to the same outputs. It seems almost all half-bridge units use the same pinout and center-tapped transformers.

                      Also, I was pretty gung-ho about it and just kinda said "Fuck it, lets see what happens."

                      Though I have no idea what happened to this project. Last I remember it still worked and I also had another YLP-013 that I made even beefier with bigger toroidal coils and heatsinks and such. All that stuff is gone now, taken to the scraper (not my decision!).

                      Comment

                      • Pentium4
                        CapXon Be Gone
                        • Sep 2011
                        • 3741
                        • USA

                        #12
                        Re: Completely rebuilt YueLin YLP-013

                        Gotcha, and that's pretty cool that you used a transformer from 1997!

                        That's too bad you lost your rebuilds you will have to do some more!

                        Comment

                        • needtoseepics
                          Member
                          • Oct 2013
                          • 11
                          • USA

                          #13
                          Re: Completely rebuilt YueLin YLP-013

                          @humblesmith1 -> the part number for Q7 on my Rev 2.2 YLP-013 is: C5027 080801.

                          I found a datasheet for a Fairchild Semi. KSC5027, so perhaps this is a clone of that chip? The Fairchild part is labeled "High Voltage and High Reliability NPN Silicon Transistor" and has the pinout 1.Base, 2.Collector, 3.Emitter. Hope this helps someone (2013-2011 = a long time). I'm rebuilding my YueLin, and will likely start a thread on it once I get a little further, and take some pics, etc, to let the legend of rebuilt YLP's continue for a new wave of badcaps forum members.

                          Comment

                          • budm
                            Badcaps Legend
                            • Feb 2010
                            • 40746
                            • USA

                            #14
                            Re: Completely rebuilt YueLin YLP-013

                            2SC5027: http://alltransistors.com/transistor...ansistor=16580

                            https://cdn.badcaps-static.com/pdfs/...9ddd056381.pdf
                            Never stop learning
                            Basic LCD TV and Monitor troubleshooting guides.
                            http://www.badcaps.net/forum/showthr...956#post305956

                            Voltage Regulator (LDO) testing:
                            http://www.badcaps.net/forum/showthr...999#post300999

                            Inverter testing using old CFL:
                            http://www.badcaps.net/forum/showthr...er+testing+cfl

                            Tear down pictures : Hit the ">" Show Albums and stories" on the left side
                            http://s807.photobucket.com/user/budm/library/

                            TV Factory reset codes listing:
                            http://www.badcaps.net/forum/showthread.php?t=24809

                            Comment

                            Related Topics

                            Collapse

                            • momaka
                              Seasonic B12 BC-550 – barely 2 years old and with BAD CAPS already!
                              by momaka
                              I know I've been a little scarce lately (like the last 2-3 years), but I'm still here and still doing my thing with fixing PSUs.

                              For today's considerations, I have a Seasonic B12 BC-550 [A551bcafh] 550 Watt ATX power supply for you (click on links for full size images).

                              https://www.badcaps.net/filedata/fetch?id=3591771


                              https://www.badcaps.net/filedata/fetch?id=3591772

                              It's a modern ATX unit with fixed (non-modular) cables and an 80-plus bronze certificate. Here's the label:

                              https://www.badcaps.net/filedata/fetch?id=359177...
                              03-12-2025, 03:42 PM
                            • flibidy
                              Magnum IA.100 Amplifier Switches on, No Output, Possible Input Side fault?
                              by flibidy
                              I have here a Magnum IA.100 which belongs to my parents.


                              The unit powers on & when the relay kicks in, you get a pop from the speakers (this might sound weird but is usual behavior for this amp). However, you get nothing coming through it from any of the inputs & no pops and crackls from any of the controls.


                              Because of the sound from the speaker when the amp turns on I have assumed that the output section probably works but I could be wrong & I'm not sure how to test that side of things further.


                              What Ive done........
                              01-01-2025, 01:26 PM
                            • SMDFlea
                              Copy DMI info easily with Hex editing software and Macro script
                              by SMDFlea
                              Copying DMI information from an old bios to a new one is difficult for some members, often they have no experience with a hex editor,or some that have tried find it too hard.There is an option to make things easier for those members so that they don`t need to post their own bios backup for the DMI copying.

                              Experienced bios modding members can help by posting in other threads the DMI offsets,macro script generated by the software and a download link to the software at softpedia mentioned in this guide,or post your macros in the comments here with a link to the bios request thread ....
                              02-28-2023, 02:14 PM
                            • ZixuTech
                              Dell XPS 15 9570 - LA-G341P - Power cycling after liquid damage and blown ISL88738
                              by ZixuTech
                              I am dealing with this LA-G341P, which had heavy liquid damage around the Audio board, Battery charging circuit. I went and cleaned liquid areas and left the audio board disconnected.

                              It had blown PQ1900/02/3 as well as a trace on PU1900. I replaced all 4, and now it turns on and switches off. With a connected battery, it turns on and stays on for a while, even loading the system, then cuts off suddenly.


                              Charger only - without a battery, the PQ201/PD200 area gets hot. I can see the chipset and CPU also warm up for a second trying to pull up to 2A, then cust off....
                              10-22-2022, 10:33 PM
                            • b0n3v
                              [Help]Reading EC - T14 G1 AMD with RT809h
                              by b0n3v
                              Hello everyone!
                              I try to read the EC ITE/IT8300FN where the bios password is stored.
                              The laptop is Lenovo T14 G1 AMD Ryzen 4650U, the MB is NM-C801.

                              I can't read the chip with RT809H with ITE board and PFC cable. Might be I need to do something more to enable programing mode(SPI Enable?).
                              I saw the post in another forum for T14s AMD (different MB but same EC configuration and pinouts) and one user successfully read and write the the same chip with SVOD3.

                              Some details what i did:
                              Battery and CMOS battery is unplugged.
                              I click Read and then...
                              05-15-2023, 04:02 AM
                            • Loading...
                            • No more items.
                            Working...