Detailed Troubleshooting & Results - Motherboard

Collapse
X
 
  • Time
  • Show
Clear All
new posts
  • Rapideye
    Member
    • Feb 2006
    • 29

    #1

    Detailed Troubleshooting & Results - Motherboard

    Hi all,
    Ive set this post up from a previous one.
    This way i can make it eaisier to explain properly, and slowly work through the troubleshooting process on motherboards.

    The Problem
    I was using A Pentium 4 Prescott 2.8Ghz skt478 in a Shuttle XPC: FB61R v2.1, not realising it didnt support this cpu and that it would damge it.
    It worked flawlessly for a year, and then realising that i should be using northwood based cores (the MOSFETS wre roastingly hot), I purchased a 2.6Ghz Northwood and installed it only to find the board wouldnt boot.
    The lights and fans were on but nobody was home.
    I worked thru all the usual troubleshooting routines, but i just could not get the northwood to boot (its working fine in my currnet DFI board).

    So, i gave up and returned to using the prescott/shuttle again, However i did find a BIOS update, but it didnt give prescott support (research has revealed that BIOS updates alone will not give compatibilty, FMB 1.5 will).

    This BIOS flash didnt work, and the system then refused to boot with either CPU installed.
    This was getting frustrating.
    I resorted to hotflashing the shuttles SST chip in my DFI, as they are the same model of eeprom.
    The Hotflash went fine using UniFlash BUT.........
    CARELESSLY, i put the chip in the shuttle socket the wrong way.
    You may aks how i did this, as the EEPROM socket are keyed in the corner.
    Well, i cracked the plastic socket when i removed the EEPROM, and being in an awkward place, and being to careless, i replaced the newly flashed EEPROM in right side up, wrong way round :-(
    This was almost instantly realised, wehn i booted up, nothing happened, and i ran my finger over the EEPROM....it was boiling hot!.............oops

    So, i ordered a nwly flashed SST EEPROM chip, installed and now im back to where i was.......the lights and fans are on but nobody is home.

    What ive tested

    The EEPROM (SST 49LF004B 3.3v) and socket has been tested, the VDD for the chip on pin #32 = 3.35v
    This was measured against Pin #16, the VSS ground and atx ground.
    This looks good as its a 3.0 -3.6v chip.

    Components:
    CPU = Tested, Working
    RAM = Tested, Working
    GFX = Tested, Working
    HDD = Tested, Working
    PSU = Tested, Working
    - PSU has been tested with multimeter, the numbers look good from the PSU side, all rails are displaying correctly.

    What next?
    So now im down to the motherboard,
    I understand that the MOSFET's and/or Capacitors could be blown/faulty and this is where i need some help.
    What method should i next use for the process of elimination?

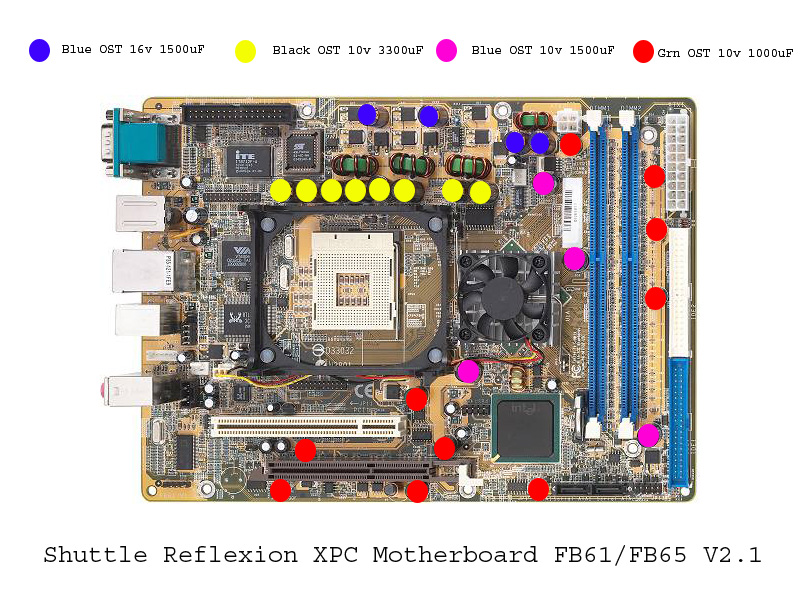
    Heres the board in question:


    If you can help me out on this process of elimination, that would be superb and greatly appreciated.
    If possible, please try not to stray too much off topic, id like to keep it specific, with suggestions and results posted only.

    Thanks in advance
    Attached Files
    Succesfull Caps = 1/1
    1. Shuttle XPC Recapping Project
  • arneson
    Badcaps Legend
    • Sep 2005
    • 1267

    #2
    Re: Detailed Troubleshooting & Results - Motherboard

    That is a realy good picture, but am I correct to say that is not your board?
    I don't see the cracked prom chip carrier.
    I will also assume that you forced the beveled side now and not the writing side down.
    This would have taken a huge amount of force, hammer?, to do.
    That style socket is not happy when broken and the board underneath, also not happy.
    So in fact, if as stated you are back to square one, I would not waiste another second. IMHO
    Jim

    Comment

    • Rapideye
      Member
      • Feb 2006
      • 29

      #3
      Re: Detailed Troubleshooting & Results - Motherboard

      Originally posted by arneson
      That is a realy good picture, but am I correct to say that is not your board?
      I don't see the cracked prom chip carrier.
      I will also assume that you forced the beveled side now and not the writing side down.
      This would have taken a huge amount of force, hammer?, to do.
      That style socket is not happy when broken and the board underneath, also not happy.
      So in fact, if as stated you are back to square one, I would not waiste another second. IMHO
      My board is almost identical, my FB61 v2.1 has a few extra 1000uF caps around various places, the pic is of a FB61 v1.0
      The EEPROM socket is cracked, but only on the plastic bit, the conatcts are all perfect, and its recieving voltage.
      it didnt take a hugs amount of force, the keyed corner was the part that was cracked, so dropping it in the wrong way wasnt hard.
      As it was right under the PSU with an inch clearance, i didnt have much room to see, i was over confident having done hotflashing many times.
      If i had of removed the PSU, i wouldn't have made the mistake of doing this.

      That set aside, the EEPROM is no longer a problem, i just thought id mention it to clarify the events as they happened.


      Ive found a site on testing caps:
      http://www.repairfaq.org/REPAIR/F_ca...ml#CAPTEST_004

      Anybody have any experience testing them with a multimeter?

      Thanks
      Succesfull Caps = 1/1
      1. Shuttle XPC Recapping Project

      Comment

      • gonzo0815
        Badcaps Legend
        • Feb 2006
        • 1600

        #4
        Re: Detailed Troubleshooting & Results - Motherboard

        I have fliped some flash devices too sometimes, i burned my fingers on it
        But again, it was working again after reseating the right way.
        If the contacts are fine, there should be no problem if the plastic carrier is broken.

        Comment

        • Rapideye
          Member
          • Feb 2006
          • 29

          #5
          Re: Detailed Troubleshooting & Results - Motherboard

          SUCCESS!

          Ive just went straight ahead and recapped the bloody thing.

          Thats one good recap under my belt.

          I got a full set of caps direct from shuttle (thanks rafal), installed them, burn in tested for 12 hours.

          Volts are stable, board temps are a little high, i think the cooling fan now needs some attention.

          thanks to all.
          Succesfull Caps = 1/1
          1. Shuttle XPC Recapping Project

          Comment

          • yanz
            Badcaps Veteran
            • Nov 2004
            • 910

            #6
            Re: Detailed Troubleshooting & Results - Motherboard

            blue, black, and green ost. the more color the merrier

            congrats on your sucesfull recapping project! i wonder what caps did shuttle sent to you?
            days are so short when you actually do something..

            Comment

            • Rapideye
              Member
              • Feb 2006
              • 29

              #7
              Re: Detailed Troubleshooting & Results - Motherboard

              They sent me OST caps, a complete set.
              They did replace the Blue 10v 1500uF with 16v 1500uF though.
              Its been running fine now for a few weeks, i have noticed some noise coming from the PCB during disk/USB operation, the board temps are a little high too.
              I have also noticed that the PSU readings are getting jumpy, 3.3v and +12v, within .05 ranges.
              Succesfull Caps = 1/1
              1. Shuttle XPC Recapping Project

              Comment

              Related Topics

              Collapse

              • SidneyCanadas
                93C46 and 93C56 EEPROM
                by SidneyCanadas
                I tore apart my instrument cluster for my 2008 Toyota Corolla made in 2007 in Cambridge, Ontario, Canada and pcb location: IC6=EEPROM is a surface mounted device with part # of 93C46W7, some claim the EEPROM out of a Camry part # 93C56 will allow odometer to roll over 299 999 KM or miles. The data sheet for both is below:

                https://cdn.badcaps-static.com/pdfs/...c6e42b20d3.pdf 2

                Anyone know if the Camry one will work on my Corolla?. And which EEPROM reader/writers do you all recommend I purchase that will allow me to read the old values of the old...
                06-14-2023, 01:16 PM
              • ShadowAi
                ASUS TUF X570-PLUS doesn't power on: no VRM_EN signal.
                by ShadowAi
                Hello, I have an issue with the motherboard. Specifically, it doesn't power on, more precisely, the POST initialization doesn't occur.

                Let me start from the beginning, the motherboard suddenly stopped working one day. There are no beep signals from the speaker, and the debug LEDs are not lighting up. After inspecting it under a microscope and using thermal imaging, I didn't find anything that could be damaged.

                After that, I began voltage measurements, in which I noticed the absence of VDDQ, VDDP, VTT, and VPP lines. Later, I checked if there is an EN state on these lines,...
                03-15-2024, 10:46 AM
              • DanFen
                Troubleshooting Uni-T EEPROM ErrE
                by DanFen
                I've got a UT139C that powers on for a second with an ErrE, before switching itself back off.

                I haven't found much information about this, other then the error being caused by the EEPROM (both on the internet and from fellow members here). While I'm using a cheaper multimeter temporarily, I'm trying to troubleshoot this... hoping it won't go to trash

                I've opened it up and did a visual inspection. Unfortunately I couldn't see anything obvious, everything looks clean and as new. No signs of damaged components.

                I'm attaching two photos: one of...
                01-06-2022, 05:09 PM
              • Tynan Dill
                Vizio e601i-A3 - Has Sound and Display, But No Backlight - Bad Power Supply Board or Bad LED Bulbs ?
                by Tynan Dill
                I was given this TV from my great uncle. He said it just wouldn't turn on one day out of nowhere, replaced the TV, and gave it to me to possibly fix and use for myself.

                Upon bringing it home and plugging it up, it showed a standby light.

                I powered it on and without a flashlight, the display showed the "V" but the lighting is very dim, but visible.

                The screen seems to blackout and stay black, but with a flashlight I can see the display.

                With my Playstation 4 connected via HDMI, and running a game I can hear sound.

                Assuming...
                11-22-2024, 01:46 PM
              • dmccul2698
                Pioneer DEX-P99rs "No EEProm " diagnostic code.
                by dmccul2698
                Hello, My head unit developed strange behaviors so I ran the built-in diagnostic package which returned "No EEProm". The service manual says there is no EEProm connected. I approached Pioneer and they said to swap out the DSP board. All said and good but the DSP board is $860 USD. I am hoping someone can help me

                1). Understand the schematic and check the connections between the EEProm and DSP
                2). Check the functionality of the EEProm

                I don't know if this is the unit's problem but it's a place to start.

                I have little to no electronic experience...
                04-08-2024, 05:32 PM
              • Loading...
              • No more items.
              Working...