These models use the same bios: Lenovo IdeaPad C340-15IML/FLEX-15IML/S340-15IML/S340-15IML Touch/S340-14IML Lenovo XiaoXin-15IML 2019/XiaoXin-14IML 2019
Backup bios used for this tutorial https://www.badcaps.net/forum/showthread.php?t=97978 Post #13
Extract & Edit.
Download the lenovo update from - https://download.lenovo.com/consumer...s/crcn17ww.exe
Extract the first exe using innoextract - https://constexpr.org/innoextract/#download
Extract the second exe using 7-zip or winrar - https://www.7-zip.org/download.html
Open the EL5C4109.ROM file with HxD hex editor - https://mh-nexus.de/en/downloads.php?product=HxD20
Use the Text search by clicking on "Search" ,then "Find" and type in the word BIOSIMG .Click on the "OK" button.
The line below BIOSIMG is the start of the new bios,put your cursor at the beginning of that line,then select "Edit" -> "Select Block" or right click and choose "Select Block".
The "Start-offset" should be already set to 130AD0 as thats where you put the cursor.
Next, click on the "Length" button and enter 1000000 (1 Million) into the white box and click on the "OK" button
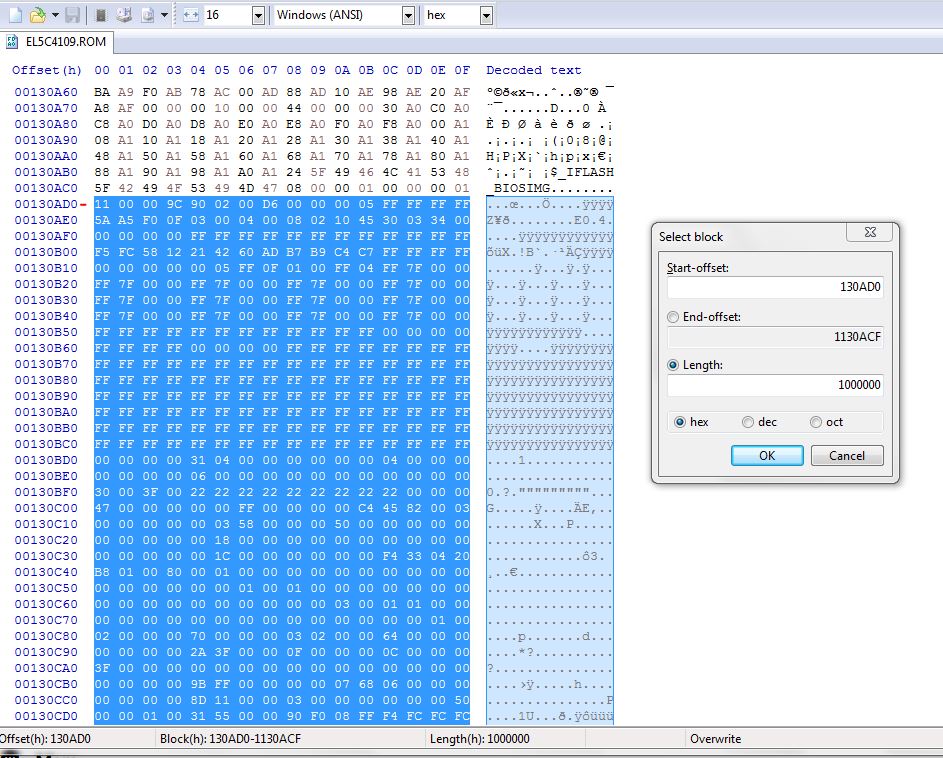
(1000000 in hex is 16MB).(some updates do not contain a full bios image,only a partial update)
Select "Edit" -> "Copy" or right click anywhere in the highlighted Blue area and select "Copy".
Next,select "File" -> "New" -> "Edit" -> "Paste insert" or right click inside the new file and select "Paste insert" .
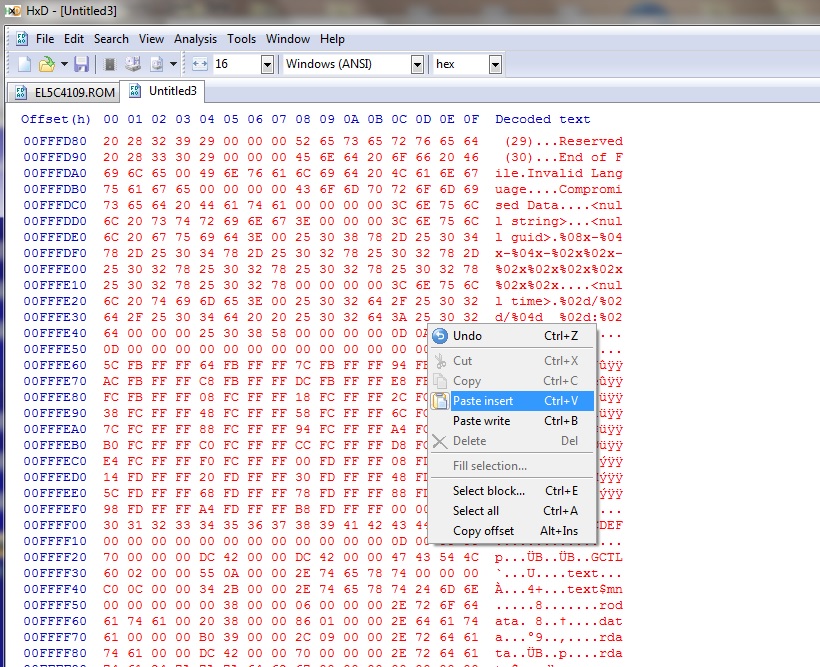
Select "File" -> "Save" and name the file with a .bin or .rom file extension, for example BIOS.BIN .Close the EL5C4109.ROM tab by right clicking on the tab and selecting Close ,or by clicking on the tab and selecting "File" -> "Close" . Keep the HxD window open with the new file.
Copying the windows key and DMI from the old bios.
Open your backup by selecting "File" -> "Open" or drag the old bios backup onto the HxD window.The new bios and backup should be side by side now on seperate tabs.
Click on the backup tab, then "Search" -> "Find" .Click on the "Hex-values" tab,enter the following by typing in or copy/pasting into the white box and
click ok:
01 00 00 00 00 00 00 00 01 00 00 00 00 00 00 00 1D 00 00 00
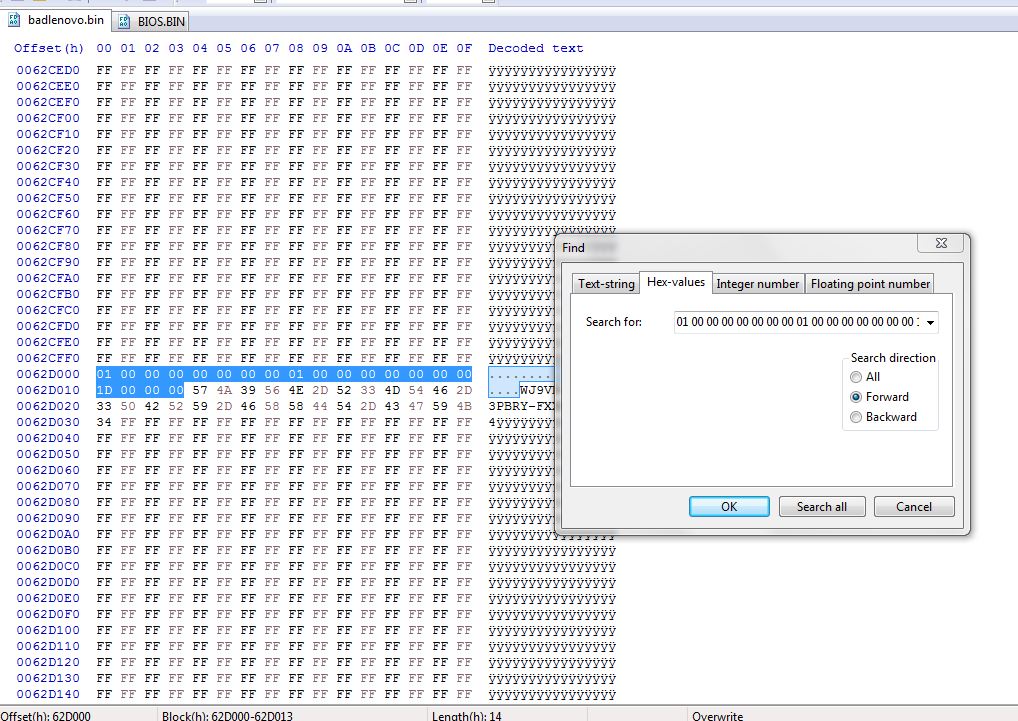
You will see the key in plain text.You need to copy the hex on the left to include the dots and key on the right,note that there is one letter or number on the fourth line down on its own.Its all too easy to forget to copy that last one,the file length in hex will be 31 if you only copy the dots and key,its much easier to copy the whole line that its on,then the length will be 40 ,much easier to remember and guaranteed not to miss the last letter/number
Right click and choose "Select block" (or use your cursor to select the 4 lines) ,set the "Start-offset" to 62D000 and the "End-offset" to 62D03F ,or click on the "Length" button and set to 40 and click OK .
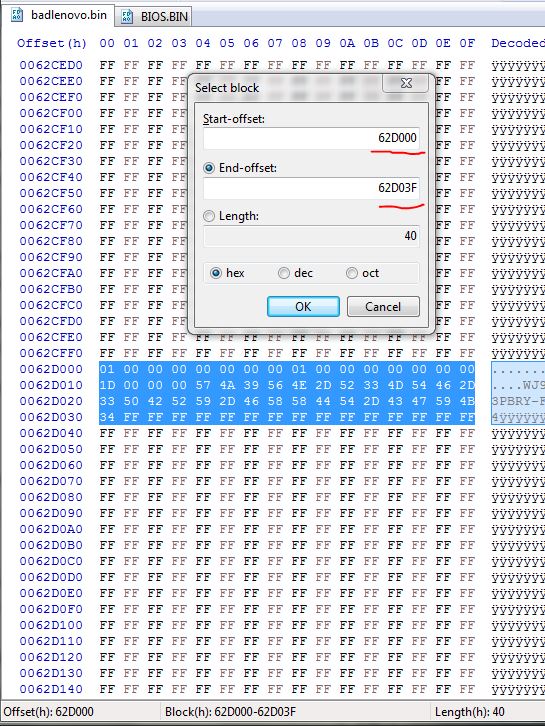
Next,choose "Edit" -> "Copy" ,click on the new bios tab,right click and choose "Select block" .Enter the same values as before,set the "Start-offset" to 62D000 and the "End-offset" to 62D03F ,or click on the "Length" button and set to 40 and click OK .
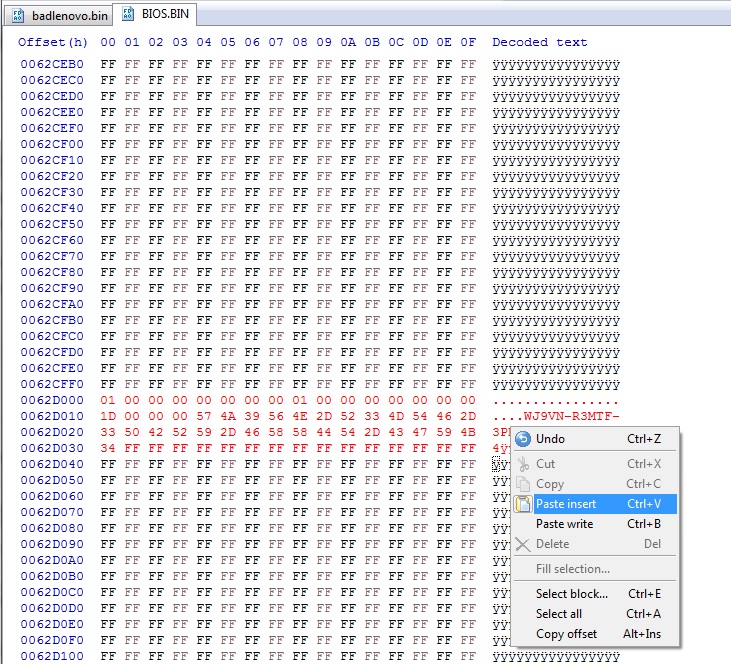
Right click and select "Paste insert" or choose "Edit" -> "Paste insert" .Select "File" -> "Save" .
Now we have to find the rest of the DMI info.Click back onto the backup tab,use the "Search" -> "Find" and enter the model number or lenovo into the Text-string white box.Set the search direction button to backward,forward or All and then click "ok".In th right side column you can see the word lenovo and some other numbers/DMI info.
Set the start-offset to 520000 and the end-offset to 5207FF ,copy and paste-insert into the same start/end offset in the new bios ,then save .
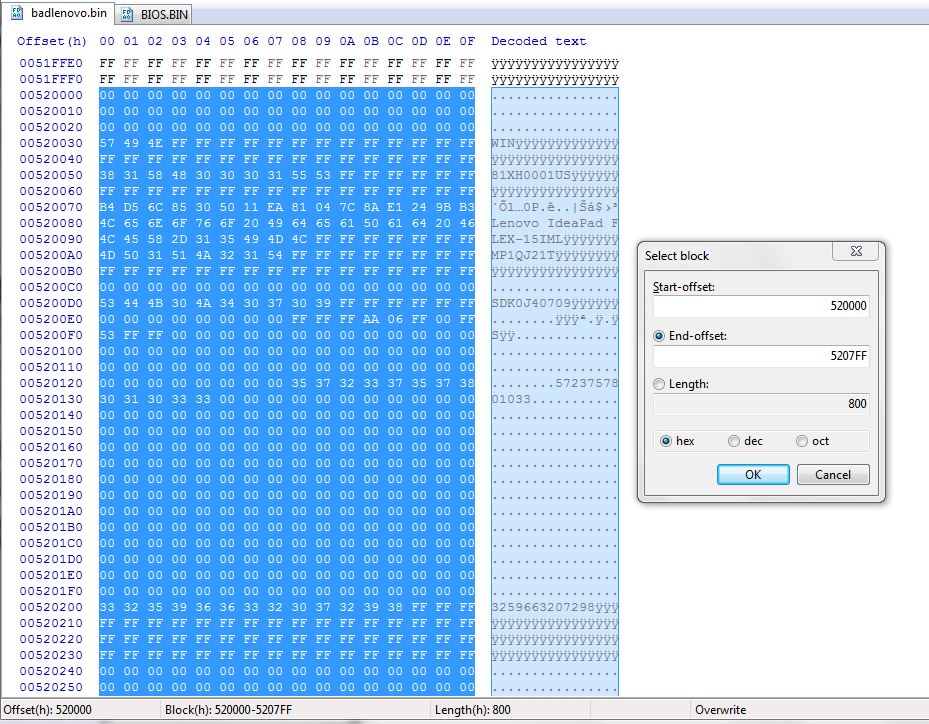
The reason for setting the offset to 5207FF will become clear when you see that the area in the new bios is all FF
.You have to use your best judgement where the DMI should be set,its a matter of trial and error finding the offsets.
With some models the DMI info is stored in the EC and there`s no need to copy it from the old backup.
Backup bios used for this tutorial https://www.badcaps.net/forum/showthread.php?t=97978 Post #13
Extract & Edit.
Download the lenovo update from - https://download.lenovo.com/consumer...s/crcn17ww.exe
Extract the first exe using innoextract - https://constexpr.org/innoextract/#download
Extract the second exe using 7-zip or winrar - https://www.7-zip.org/download.html
Open the EL5C4109.ROM file with HxD hex editor - https://mh-nexus.de/en/downloads.php?product=HxD20
Use the Text search by clicking on "Search" ,then "Find" and type in the word BIOSIMG .Click on the "OK" button.
The line below BIOSIMG is the start of the new bios,put your cursor at the beginning of that line,then select "Edit" -> "Select Block" or right click and choose "Select Block".
The "Start-offset" should be already set to 130AD0 as thats where you put the cursor.
Next, click on the "Length" button and enter 1000000 (1 Million) into the white box and click on the "OK" button
(1000000 in hex is 16MB).(some updates do not contain a full bios image,only a partial update)
Select "Edit" -> "Copy" or right click anywhere in the highlighted Blue area and select "Copy".
Next,select "File" -> "New" -> "Edit" -> "Paste insert" or right click inside the new file and select "Paste insert" .
Select "File" -> "Save" and name the file with a .bin or .rom file extension, for example BIOS.BIN .Close the EL5C4109.ROM tab by right clicking on the tab and selecting Close ,or by clicking on the tab and selecting "File" -> "Close" . Keep the HxD window open with the new file.
Copying the windows key and DMI from the old bios.
Open your backup by selecting "File" -> "Open" or drag the old bios backup onto the HxD window.The new bios and backup should be side by side now on seperate tabs.
Click on the backup tab, then "Search" -> "Find" .Click on the "Hex-values" tab,enter the following by typing in or copy/pasting into the white box and
click ok:
01 00 00 00 00 00 00 00 01 00 00 00 00 00 00 00 1D 00 00 00
You will see the key in plain text.You need to copy the hex on the left to include the dots and key on the right,note that there is one letter or number on the fourth line down on its own.Its all too easy to forget to copy that last one,the file length in hex will be 31 if you only copy the dots and key,its much easier to copy the whole line that its on,then the length will be 40 ,much easier to remember and guaranteed not to miss the last letter/number
Right click and choose "Select block" (or use your cursor to select the 4 lines) ,set the "Start-offset" to 62D000 and the "End-offset" to 62D03F ,or click on the "Length" button and set to 40 and click OK .
Next,choose "Edit" -> "Copy" ,click on the new bios tab,right click and choose "Select block" .Enter the same values as before,set the "Start-offset" to 62D000 and the "End-offset" to 62D03F ,or click on the "Length" button and set to 40 and click OK .
Right click and select "Paste insert" or choose "Edit" -> "Paste insert" .Select "File" -> "Save" .
Now we have to find the rest of the DMI info.Click back onto the backup tab,use the "Search" -> "Find" and enter the model number or lenovo into the Text-string white box.Set the search direction button to backward,forward or All and then click "ok".In th right side column you can see the word lenovo and some other numbers/DMI info.
Set the start-offset to 520000 and the end-offset to 5207FF ,copy and paste-insert into the same start/end offset in the new bios ,then save .
The reason for setting the offset to 5207FF will become clear when you see that the area in the new bios is all FF
.You have to use your best judgement where the DMI should be set,its a matter of trial and error finding the offsets.
With some models the DMI info is stored in the EC and there`s no need to copy it from the old backup.

Comment