Plastic/fiberglass working

Collapse
X
 
  • Time
  • Show
Clear All
new posts
  • Curious.George
    Badcaps Legend
    • Nov 2011
    • 2305
    • Unknown

    #1

    Plastic/fiberglass working

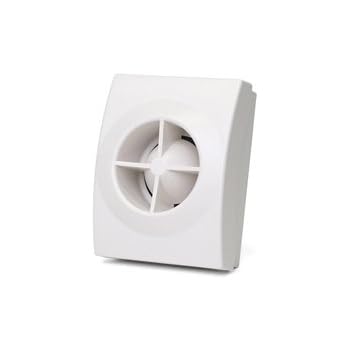
    I've got several of these "sirens"/noise makers:

    I want to modify (or replace) the top plate for cosmetic (and mechanical) reasons.

    E.g., in a couple of cases, I want the cover to appear as a 5" diameter, FLAT circular plate with the "port" located in the center. In every case, these will be subject to reasonably close (though casual) inspection so I really don't want them to look amateurish.

    Note that the current "top" is rectangular (instead of square or circular). And, that it has a bowed shape along the long axis, instead of being flat.

    First thought was to 3D print a replacement. And, hope I could solvent wash it to get a reasonably smooth finish.

    The problem is the center portion of the port. It's a horn loaded driver for extra efficiency. So, what you don't see in the photo is the shape of the interior surfaces! If you were to slice the cover in half directly through the center, along the long axis, you'd get a cross section similar to pictured below.

    The pressure wave begins at the bottom of the arrow and winds its way around the folds in the "horn" until exiting through the visible port. Getting the shape of this curve correct in CAD would be a PITA (I know the principles but not the details!).

    So, I'd like to cut out the center portion of the cover and mount it to -- or build around it -- something more easily fashioned. E.g., cut a hole as large as the exit opening in the port in a sheet of plastic and "glue" the port assembly to that.

    But, I assume this will be a noticeable kludge. Any pointers as to how I might make it "more presentable"? I'm tempted to try a solvent wash (and paint, thereafter) but don't have any "spares" of these to experiment on so want to be reasonably confident of any approach before starting.

    Another approach would be to perforate a plain cover plate (instead of cutting a big hole in it) and mount this to the rear. I'm not sure how that would affect the SPL. And, the "exposed port" looks cooler! :<
    Attached Files
  • redwire
    Badcaps Legend
    • Dec 2010
    • 3912
    • Canada

    #2
    Re: Plastic/fiberglass working

    Those Honeywell, Ademco alarm sirens all use that folded-horn.

    If you want it flat, I see no easy way to keep the horn. Horns needs depth at least an inch or two and the only slim horns I see are in car horns. There, the throat is wrapped on edge (see pic).

    Without a horn, you will lose many dB SPL and the piezo transducer will move more as it is not (acoustically) loaded.
    I don't know how much room you have to make the siren worthy of a beauty contest. People put then in furnace ducts/cold-air returns to hide them.

    pic from https://en.wikipedia.org/wiki/Horn_loudspeaker
    Attached Files

    Comment

    • Curious.George
      Badcaps Legend
      • Nov 2011
      • 2305
      • Unknown

      #3
      Re: Plastic/fiberglass working

      Originally posted by redwire
      If you want it flat, I see no easy way to keep the horn. Horns needs depth at least an inch or two and the only slim horns I see are in car horns. There, the throat is wrapped on edge (see pic).
      I only care that the top surface be flat (instead of crowned). I have a few inches behind the surface for the driver, wiring, etc. But, want the "exposed surface" to be flat -- so, envisioned a flat plate with a (large) round hole cut in it having the inner diameter of the outer horn envelope. The rest of the mechanism tucked up behind that surface.

      Without a horn, you will lose many dB SPL and the piezo transducer will move more as it is not (acoustically) loaded.
      Exactly. The whole point is to preserve the intensity of the siren and the relatively small package.

      I don't know how much room you have to make the siren worthy of a beauty contest. People put then in furnace ducts/cold-air returns to hide them.
      Code doesn't allow that, here.

      If I can (solvent?) "melt" a plastic flat cover plate to the existing horn assembly, they will fit nicely in the spaces I've set aside for them. Merging those two surfaces ("melting") in an aesthetically pleasing way is the problem. My fallback position is a perforated plate behind which the horn assembly can be mounted (adhered with glue applied indiscriminately as it won't be visible)
      Attached Files

      Comment

      • redwire
        Badcaps Legend
        • Dec 2010
        • 3912
        • Canada

        #4
        Re: Plastic/fiberglass working

        I tried to come up with some ideas but the best is using a cloth or louvered grille to cover the barnacle.

        Built-in vacuum cleaner outlet, or an outdoor louvered (dryer) vent would have some plastic bits. Ideally an electrical outlet wallplate. I'd just silicone seal where it meets.

        These are 12VDC sirens, code here allows them anywhere as long as the wiring is plenum rated and there is a Class 2 fuse in the alarm panel.

        A 3D print would have to be two or more pieces and snap fit together. The original piece is injection molded so it must come apart.

        Horn tweeter pics also give some ideas.

        Comment

        • Curious.George
          Badcaps Legend
          • Nov 2011
          • 2305
          • Unknown

          #5
          Re: Plastic/fiberglass working

          Originally posted by redwire
          A 3D print would have to be two or more pieces and snap fit together. The original piece is injection molded so it must come apart.
          In a sense, it's a two piece assembly -- but, I think it can be 3D printed as a single piece, even if the throat of the horn was not part of the driver assembly.

          Note the "step" on the driver (just outside the circle formed by the screws affixing the throat to the driver) forms an acoustically continuous surface with the "lip" in the cover, when they are mated.

          Presently, the driver is mounted to the back plate of the "siren assembly". Manufacturing tolerances ensure the (hinged) cover closes on the driver to form this "seal" (step to lip).

          My thought was to remove the cylindrical center portion of the cover (anything "outside" that cylinder is "outside" the acoustic path of the horn). Then, adhere it to the driver so I have a cylindrical assembly with the driver at rear and the horn mouth at the front.

          If I could adhere this to a flat plate (with a hole bored for the acoustic pressure wave's exit) then that plate could support the driver (a pair of mounting holes in that plate could fasten it to a typical 3" round Jbox)
          Attached Files
          Last edited by Curious.George; 12-31-2018, 05:36 PM.

          Comment

          Related Topics

          Collapse

          • howardc64
            A1312 (27” iMac 2009-2011) A1407 (Thunderbolt Display) A1316 (Cinema Display) Display Black Screen Repair
            by howardc64
            Problem

            This is an LG edge LED lit LCD Display. The LEDs are on the bottom edge of the display. There are 2 bars (left and right) Each bar has many LEDs and a 6 pin connector. Each pin drive several LEDs thus is the highest current flow / heat junction. The weak lead free solder gradually fails with thermal expansion/contraction cycling and increases resistance. PSU will compensate up to a point, then when the current is too high, PSU just shut down the backlight causing a dark display. I have even seen one which the connector just fell off as solder points became completely detached....
            08-04-2024, 10:36 PM
          • Kemer
            Led status indicator light transfer plastic
            by Kemer
            Hello, the LED status indicators on my Lenovo Z580 are not working. Actually the motherboard LEDs are working but the light doesn''t coming to the front view. The plastic part is which you can see in photo must transfer the light to the frontview but just half of the plastic is illuminating.

            There are three status indicators on the front (power, battery, caps lock), and none of them are illuminated.

            The plastic piece doesn't appear to be broken.

            1. What are your suggestions for resolving this issue?

            2. Is the plastic piece made of special ma...
            08-19-2025, 07:02 PM
          • dclass-pro
            HP 440 G2 no power after short in flat lcd
            by dclass-pro
            Hi all guys, I need your help. On a HP 440 G2 - LA-B181P laptop I was changing the speakers and the pc worked fine everything ok.
            After closing it all with all the screws I realized that it would no longer turn on. I opened it and found that the flat cable of the LCD was shorted. I ordered a new flat but the motherboard still won't turn on, as soon as I connect the power supply the connector LED always flashes and the power button stays on.
            I tried to check the voltages and the 3v and 5v are there, on the battery pin (with no battery connected) I have about 2v.
            I tried to...
            08-11-2023, 07:47 AM
          • reformatt
            A2337 not working with flat battery
            by reformatt
            Looking for some advice on a 820-02016 board as I don't have much experience with these M1 machines. Learning the nuances of them as I go.

            So the history of this machine was it had been in a bag where a bottle of water leaked. Presented as dead about a month ago, corrosion was mainly around the battery connector and it's sub-PCB. Some corrosion was noted on the board around UC300, CC325, CW1C7, CW1C8. That was it really.

            Now without battery connected, USB-C will stay at 5V and cycle between 0 and 120ma. PPBUS_AON is cycling between 0 to 12.3V. If battery is connected,...
            10-12-2023, 04:36 PM
          • lfhlaw
            Busted/cracked Light diffuser plate Samsung UN55NU7100
            by lfhlaw
            I was attempting to replace the LED lights on an Edge-lit Samsung UN55NU7100...While removing the sheets and the light diffuser plate which already had cracks at the bottom. The plate bent(more than I'd like) and broken in half.

            1) Is it still usable if I can put in back into place

            2) or Do I have to find a replacement diffuser plate and can it be any diffuser plate from a 55" Samsung LED TV or specific to my model?

            3) can a new plate be purchased from Samsung?
            03-21-2021, 01:31 PM
          • Loading...
          • No more items.
          Working...