Announcement

Collapse
No announcement yet.

Guide to resizing your pictures

Collapse
This is a sticky topic.
X
X
 
  • Filter
  • Time
  • Show
Clear All
new posts

    Guide to resizing your pictures

    Here is just a quick guide on how to resize your pictures using Windows 7 and the Paint program that comes pre installed.

    All images need to be 2000 x 2000 pixels or less and cannot exceed 2MB in size per picture for them to be accepted by the forum.

    To check the size of an image right click on it and then select properties. This will give you the size.

    To check how many Pixels an image is you need to right click select properties then select the details tab at the top. This will give you the dimensions of the picture as shown below.
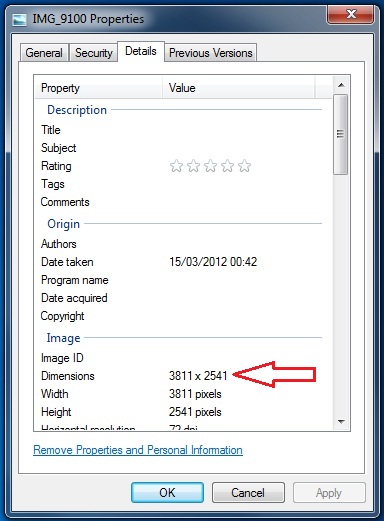


    If you image is less than 2MB and no more than 2000 x 2000 then you don't need to edit that image for it to work.

    As you can see in the example above this image needs to be reduced.

    To do this right click on your image and select EDIT.


    This should load up your image into the Paint program. on the top left you will see a button that says RESIZE. Clicking on that will open up another box. Here you need to select pixels as show below.
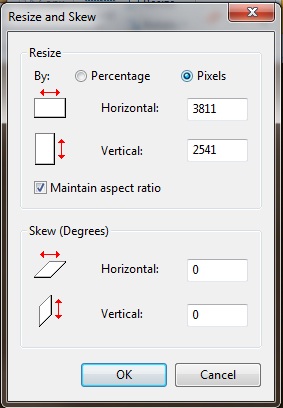


    Here you can see the dimensions of your image currently. What you need to do is change the highest dimension to 2000 or below. This will then automatically adjust the other dimension for you to make sure that your image keeps it shape.
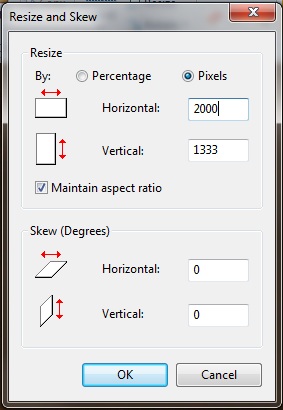


    Now select OK and you image will be resized keeping it shape. To save just click file then save or save as.

    Just a simple guide to hopefully save you some time and make sure that you are giving as clear an image as possible for people to help you out.
    Attached Files
    Fixed so far : 1 Home cinema system, 16 LCD Monitors, 4 LCD TV's

    How to resize your pictures guide click HERE
    Retiredcaps Ideal post example click HERE

    #2
    Re: Guide to resizing your pictures

    And if you're using the excellent freeware Irfanview, you just have to go to Image > Resize/Resample and set the largest side to 2000:


    If you have checked "Preserve aspect ratio (proportional)", Irfanview will automatically change the value for the other dimension to maintain the aspect ratio of the picture.
    Click Ok and then save into whatever format you wish.

    If you have several pictures, you can use the "Batch conversion" feature to do it.
    Simply go to File > Batch Conversion/Rename and you'll get this window :


    Go in the folder where the pictures you want to resize are located, select the ones you want and click Add, or click on "Add all" to add all pictures in that folder to the conversion queue.
    (if you click on "Include subdirectories" on the bottom left corner, Add all will also add pictures from all folders inside)

    Once you have the pictures queued, click on "Work as: Batch conversion" (top left) and then select the format you want to save in.
    Then, check "Use advanced options ..." because that will tell Irfanview to perform operations on every picture, not just conversions from one file type to another.
    Click on the Advanced button, and you will get this screen:


    The options in this panel are self explanatory:

    Click on the Resize checkbox to enable resizing for every picture in the queue.
    Click on Set long size and enter 2000 pixels and Irfanview will automatically resize so that whatever side of picture is the longest it will be 2000 pixels.
    Check Preserve aspect ratio..
    Check Use resample function as it gives better quality but takes a bit more time for every picture
    Check Don't enlarge smaller images because there's no point to it in this case.
    If you want, you can enable auto adjust colors, or use the crop feature to cut something out of each pictures but as you can see I didn't enable them.
    Now click ok.

    Back on the main screen the only thing left to do is selecting where the processed pictures will be stored.
    Select a proper folder for your processed pictures and click on Start Batch. A couple of seconds later, your pictures are done.

    Irfanview can be found here: http://www.irfanview.com/

    It's freeware but keep in mind that during setup, it will offer to install a search engine toolbar. You can simply uncheck the box and it won't install anything.
    Attached Files

    Comment


      #3
      Re: Guide to resizing your pictures

      hi just ordered a sh digital camera i know we need to resize them to 2000 x 2000 to get best pics for people to view but i dont realy understand the 2mb bit can i alter this size in my pics to as near to 2mb or is this a camera setting i need to alter cheers guys

      Comment


        #4
        Re: Guide to resizing your pictures

        When you change the resolution changes to 2000 x 2000 you will find it will more than likely become less than 2mb.
        Fixed so far : 1 Home cinema system, 16 LCD Monitors, 4 LCD TV's

        How to resize your pictures guide click HERE
        Retiredcaps Ideal post example click HERE

        Comment


          #5
          Re: Guide to resizing your pictures

          Originally posted by vinceroger69 View Post
          hi just ordered a sh digital camera i know we need to resize them to 2000 x 2000 to get best pics for people to view but i dont realy understand the 2mb bit can i alter this size in my pics to as near to 2mb or is this a camera setting i need to alter cheers guys
          You don't need to fiddle with size/resolution on the camera unless you need to for other reasons. Resize them on the computer and upload the resized file.

          Comment


            #6
            Re: Guide to resizing your pictures

            paint.net is good free software for windows too

            Comment

            Working...
            X