Re: Rubycon MBZ leaks in storage!
Well, I am not saying that overvolting caps is safe. But you can apply the maximum rated voltage on the cap without consequences, if you have a resistor in series with the cap to limit the current. Generally, that should be a few to a few hundred uA (microAmps), which for most electrolytic caps we use here, is close to their cap leakage current. With a 10 KOhm series resistor and 5V as the power supply, the maximum current that can flow through the cap will be 5V / 10 KOhm, or 0.5 mA (500 uA).
Also, electrolytic caps can usually withstand a "surge" voltage that is slightly higher than their rated voltage. For example, if you look in the United Chemicon KY datasheet, you will see that 6.3V caps can take up to 8V surge for short periods of time without damaging the caps.
Not exactly.
Technically speaking, you may be able to get away with that, because once you go over the rated voltage on a cap, its internal leakage current greatly increases. And if you are limiting the current, the voltage across the cap will drop due to the increased leakage current. Of course, you'd have to be very careful about limiting the current. If you don't limit it enough, you can internally overheat the cap from the overvoltage and damage it.
Here is how I do it:
V1 is the power source - in my case a 20V laptop adapter for 16V and 20V caps and 9V wall-wart that outputs 14V unloaded for 10V and 6.3V caps.
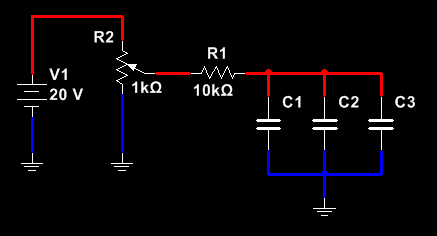
The way I work it:
1. Remove the 10 KOhm series resistor (R1)
2. Adjust 1 KOhm pot (R2) to appropriate cap voltage (i.e. about 6V for 6.3V caps and 9.5V for 10V caps)
3. Re-insert back 10 KOhm resistor and leave the setup alone for some time
C1-C3 are the caps I wish to reform. You can have as many as you like in parallel (but less than 10 is a bit better to avoid large charging periods, especially when you go above 1000 uF caps). I usually build the setup on a breadboard and insert/remove parts and caps as needed.
With a 10 KOhm series resistor, you won't need anywhere near these currents. A few mA would be more than enough. So anything from a wall wart to a few 9V batteries in series will do the trick here.
Originally posted by mockingbird
View Post
Also, electrolytic caps can usually withstand a "surge" voltage that is slightly higher than their rated voltage. For example, if you look in the United Chemicon KY datasheet, you will see that 6.3V caps can take up to 8V surge for short periods of time without damaging the caps.
Originally posted by mockingbird
View Post
Technically speaking, you may be able to get away with that, because once you go over the rated voltage on a cap, its internal leakage current greatly increases. And if you are limiting the current, the voltage across the cap will drop due to the increased leakage current. Of course, you'd have to be very careful about limiting the current. If you don't limit it enough, you can internally overheat the cap from the overvoltage and damage it.
Originally posted by mockingbird
View Post
V1 is the power source - in my case a 20V laptop adapter for 16V and 20V caps and 9V wall-wart that outputs 14V unloaded for 10V and 6.3V caps.
The way I work it:
1. Remove the 10 KOhm series resistor (R1)
2. Adjust 1 KOhm pot (R2) to appropriate cap voltage (i.e. about 6V for 6.3V caps and 9.5V for 10V caps)
3. Re-insert back 10 KOhm resistor and leave the setup alone for some time
C1-C3 are the caps I wish to reform. You can have as many as you like in parallel (but less than 10 is a bit better to avoid large charging periods, especially when you go above 1000 uF caps). I usually build the setup on a breadboard and insert/remove parts and caps as needed.
Originally posted by mockingbird
View Post
Attached Files

Comment